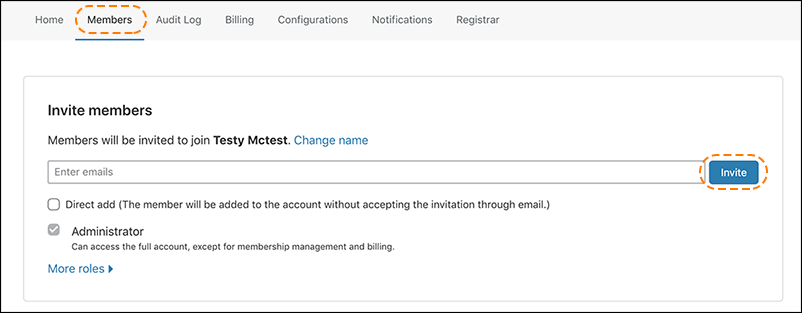
All Cloudflare customer plans can share account access with additional members.
Customers in all plans can have members with the following roles:
- Super Administrator – All Privileges: Can edit any Cloudflare setting, make purchases, update billing, and manage memberships. Non-enterprise customers can only have one super administrator.
- Administrator: Can access the full account and configure dashboard, but cannot manage billing or account membership. An unlimited number of members can be added to an account as administrators.
In addition, Enterprise customers can have more than one super administrator and assign additional membership roles. Also, super administrators can the revoke access of other super administrators. Learn How to set up Multi-User accounts on Cloudflare.
To learn more about multi-user access, visit this blog post.
Add account members
Follow these steps to add members to your account:
1. Log in to the Cloudflare dashboard.
2. Click the appropriate Cloudflare account where access will be shared. You should see the Home tab with a list of your sites.
3. Click the Members tab located in the top navigation bar.
4. In the Invite Members panel, enter the email address requiring account access. You can enter additional email addresses.Ensure Cloudflare configurations for the subdomain are moved from the parent domain to the child subdomain before activating the child subdomain at Cloudflare. Refer to the best practices for adding child subdomains.
5. Click Invite.
6. The new members will receive an email invitation with a confirmation link.
Revoke account membership
Follow these steps to revoke user access:
1. Log in to the Cloudflare dashboard.
2. Click the appropriate Cloudflare account where access will be removed. You should see the Home tab with a list of your sites.
3. Click the Members tab located in the top navigation bar.
4. Scroll to the list of Members.
5. Enter the email address to revoke. The Members list automatically updates with matching results.
6. Click the expand arrow to the far right of the email address requiring revocation.
7. Click Revoke, then click Yes, revoke access to confirm.
