Autoresponder is a computer program that answers the emails it receives automatically. There are many Autoresponders out there, and some of them are easy to use, while others are more complex. This article will go over the steps you need to take to set up your Autoresponder through your cPanel.
A cPanel is a control panel that enables you to access a set of different tools so that you can modify your website and its settings. Through the cPanel, you decide what your website will look like to the customers or the “end users,” and you have complete control over a myriad of actions. The cPanel dashboard is praised for being extremely user-friendly and for allowing everyone, including non-professionals, for doing as they please with their sites in a simple, straightforward manner.
So, with all of this in mind, let’s see what you need to do in order to configure Autoresponder for your email account via your cPanel, and where you can find what you need to complete this process.
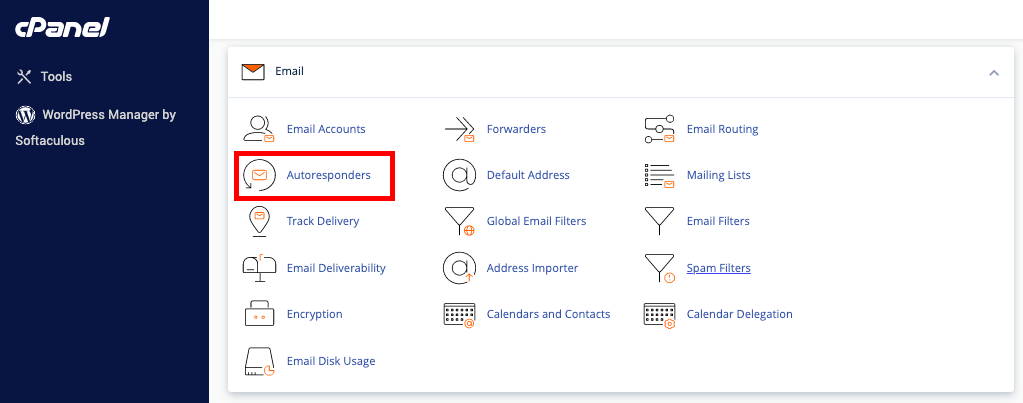
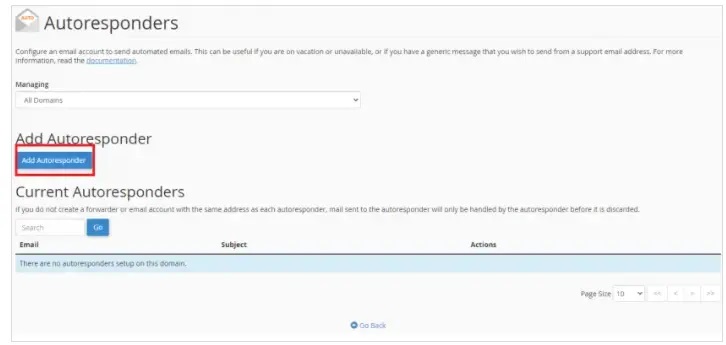
First, you need to log in to your cPanel account. After you have done that, look for the “Email” option and select the “Autoresponders” tool. This will redirect you to another page, where the button responsible for adding new Autoresponders is located and also shows all your existing autoresponders.
 To set up a new autoresponder for your email account, you need to click on the “Add Autoresponder” button.
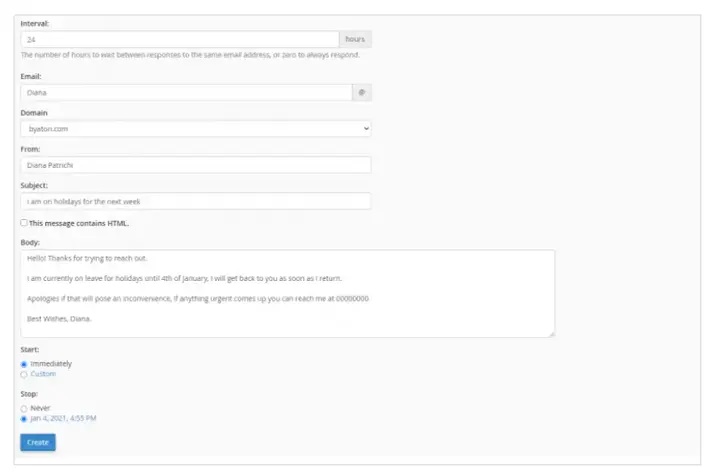
 After you click this, many different settings will pop up on the screen for you to configure. Let’s break down what they do:
The “Interval” setting refers to the amount of time/hours the Autoresponder should let pass between responding to the same email address. Basically, this setting determines how often a message should be sent to the same sender when one person sends you an email several times.
In the “Email” setting, you need to type out your email address. In the “From” setting, you need to put in from whom the message is, so you either put in your name or someone else’s, depending on what you want.
In the “Subject” set, you put in the subject of the automated email that the Autoresponder would send out. For instance, “In a meeting.”
In the “Body” setting, you should type out the automated message’s content. For this, you can make a custom HTML body that can have various links, images, etc., in them. Usually, people put information like when they are back from a holiday in this setting.
The last two settings, the “Stay” and “Stop” boxes, are used to set up the time when the Autoresponder should begin with responding, and it should automatically stop. This means that you will not have to turn it on and off by yourself manually.
