What Is A Robots.txt File?
First of all, the robots.txt is nothing more than a plain text file (ASCII or UTF-8) located in your domain root directory, which blocks (or allows) search engines to access certain areas of your site. The robots.txt contains a simple set of commands (or directives), and it’s typically applied to restrict crawler traffic onto your server, thus preventing unwanted resource usage.
Search engines use so-called crawlers (or bots) to index parts of a website and return those as search results. You might want specific sensitive data stored on your server to be inaccessible for web searches. The robots.txt file helps you do just that.
Note: Files or pages on your website are not entirely removed from crawlers if these files are indexed/referenced from other websites. To protect your URL from appearing in Google search engines, you can password-protect the files directly from your server.
How To Create The Robots.txt File
To create your robots.txt file (if not already existent), follow the following steps:
1. Log into your cPanel account
2. Navigate to Files section and click on File Manager
3. Browse File Manager to the website directory ( e.g public_html ) then Click on “File” >> Type in “robots.txt” >> Click on “Create New File”.
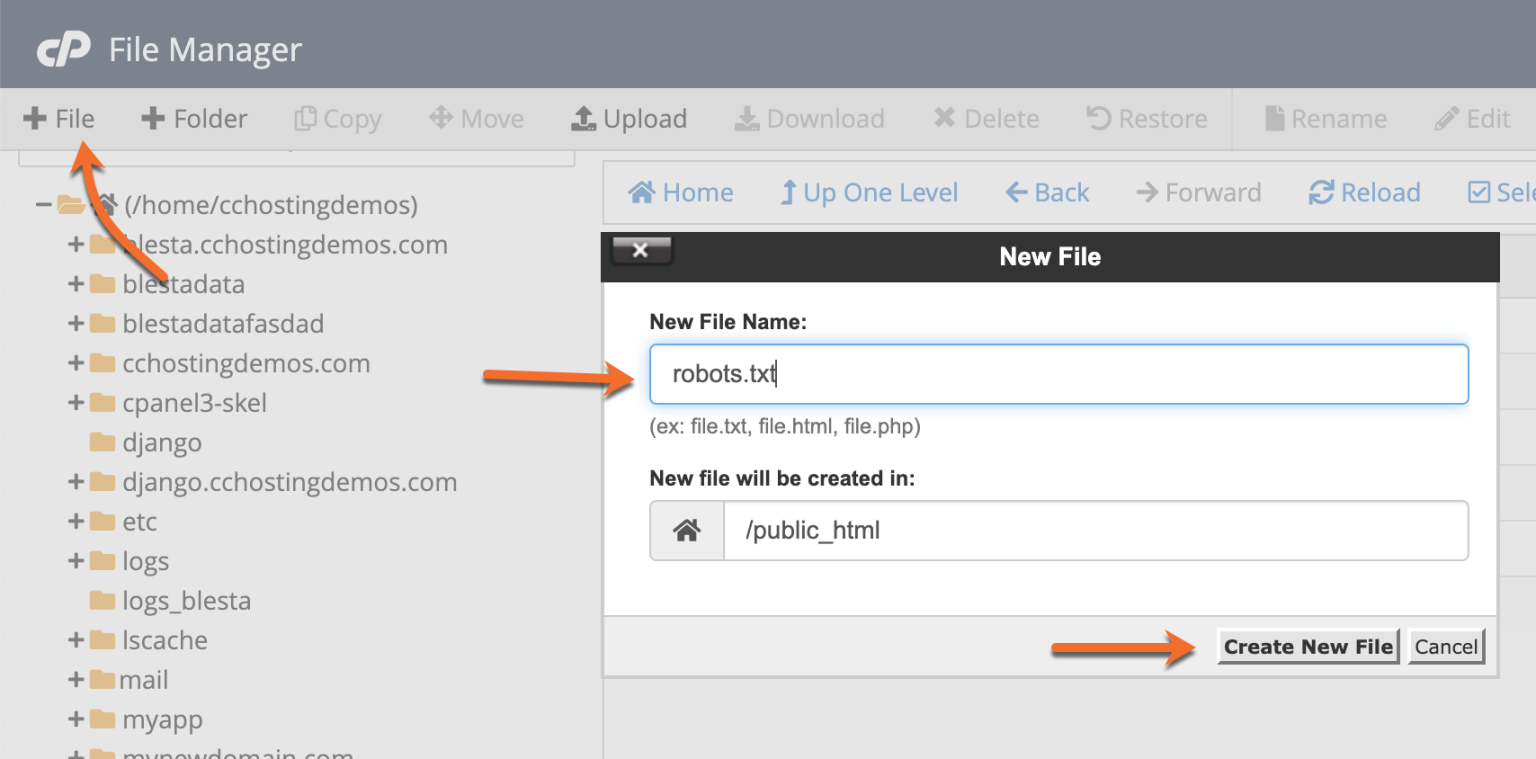
4. Now, you are free to edit the content of this file by double-clicking on it.
Note: you can create only one robots.txt file for each domain. Duplicates are not allowed on the same root path. Each domain or sub-domain must contain its own robots.txt file.
Examples Of Usage And Syntax Rules
Usually, a robots.txt file contains one or more rules, each on its own separate line. Each rule blocks or allows access to a given crawler to a specified file path or the entire website.
- Block all crawlers (user-agents) from accessing the logs and ssl directories.
User-agent:*
Disallow: /logs/
Disallow: /ssl/
- Block all crawlers to index the whole site.
User-agent: *
Disallow: /
- Allow all user agents to access the entire site.
User-agent: *
Allow: /
- Block indexation for the whole site from a specific crawler.
User-agent: Bot1
Disallow: /
- Allow index to a specific web crawler and prevents indexation from others.
User-agent: Googlebot
Disallow:
User-agent: *
Disallow: /
- Under User-agent: you can type in the specific crawler name. You can also include all crawlers simply by typing in the star (*) symbol. With this command, you can filter out all crawlers except AdBot crawlers, which you need to enumerate explicitly. You can find a list of all crawlers on the internet.
- Additionally, for the Allow and Disallowcommands to work only for a specific file or folder, you must always include their names between “/”.
- Notice how both commands are case-sensitive? It is especially relevant to know that the crawler agents’ default setting is so that they can access any page or directory if not blocked by a Disallow: rule.
Note: You can find complete rules and syntax examples here.