If you’re looking to get the most out of your web hosting, then cPanel is an essential tool. cPanel gives you access to a range of features that can help you manage your website more effectively. Whether it’s adding new applications or files, or simply keeping track of what’s going on behind the scenes, cPanel makes life much easier for webmasters.
Of course, cPanel is only as good as the web hosting company that provides it. So be sure to do your research and choose a reputable provider that will give you all the tools you need to succeed online.
There are many factors to consider when choosing a cPanel host for your business, such as customer support, pricing, performance, features, and reliability. The cPanel is a vital part of a web host as it allows you to manage various aspects of a web server, including email accounts, files, databases, and SSL certificates. With so much at stake, it is important to be careful and select the best possible option for your needs.
How to create and manage cPanel Account in WHM?
The first step to creating and managing your cPanel account is accessing your cPanel. However, before you can do this, you must purchase a domain name and hosting plan from a web host. Once you have done this, you can then log in to your cPanel account via the web host manager.
Step 1: Login to cPanel
There are a few different ways that you can log in to your cPanel account. One of the easiest ways is to type in your website address, followed by a colon and 2083. So, for example, if your website is www.domain123.com, you would need to type www.domain123.com:2083into your browser’s address bar.
This will automatically take you to the login page, where you’ll need to enter the username and password that were emailed to you when you set up your account.
Step 2: Creating an account
In order to create a new account on your website, start by accessing the website settings. Then, click on the “Account Functions” option. Next, click on the “Create a New Account” button to begin the process.
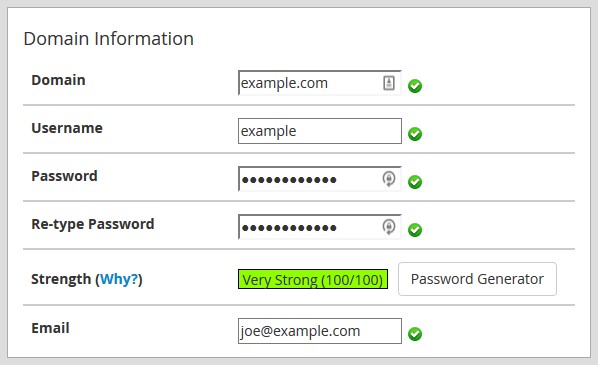
Step 3: Fill in the necessary information
In order to create a new account, you will need to provide some basic information such as a domain name, username, password, and email address. Be sure to fill out all the fields accurately.
The domain name is what will be used primarily for your cPanel account. The username is the name you will use when logging in to cPanel. Every username has a corresponding password which you will need in order to access cPanel. Lastly, the email address is where you will receive notifications from cPanel.

Step 4: Select Package
You have the option to select from a variety of different packages. Choose the one that best suits your needs.

Step 5: Select theme
In this section, you can choose your language and theme preferences.

Step 6: Optional setting
Welcome to the wonderful world of web hosting! Creating a new cPanel account is easy and only takes a few minutes. Simply follow the steps below and you’ll be up and running in no time.
- Enter your desired account name and password in the appropriate fields.
- Select your preferred DNS and Mail Routing settings. If you’re not sure what these are, don’t worry – the defaults will work just fine in most cases.
- Click the “Create Account” button.
Advantages of cPanel for website Owners
cPanel provides website owners with a number of powerful features that can be extremely helpful for businesses trying to promote their products and services online. Some benefits of using cPanel include:
-The ability to manage multiple websites from a single account
-A user-friendly interface that makes it easy to get started
User-friendly interface
The cPanel interface is designed for easy navigation, with a dashboard, menus and graphics that make finding what you need a breeze. Installing and uploading files to your web host is simple and straightforward, making cPanel an excellent choice for those looking for a user-friendly platform.
Highly compatible
Many people enjoy using WordPress because it is compatible with a variety of web browsers, including Mozilla Firefox, Safari, and Google Chrome. Additionally, it supports many different third-party applications, such as SEO tools and site builders.
Extensive features
With the user-friendly dashboard, anyone can easily manage MySQL databases, create FTP accounts and subdomains, and generate website backups – no advanced technical knowledge required.
Reliable support system
cPanel blogs and forums offer comprehensive manuals for WHM and cPanel, providing in-depth analysis and solutions for several cPanel products.
Application installer
Looking to add some new features to your website? cPanel has you covered, with over 400 applications available for installation. And thanks to the integrated Softaculous apps installer, getting everything set up is a breeze. So why wait?
Wrapping up
The cPanel interface provides a wealth of options for web users who want to take control of their website applications and files. With Softaculous, you can install software with ease, create FTP accounts, email accounts, databases and usernames, set up Free AutoSSL, and view web traffic data – all from one convenient platform.
Creating and managing a cPanel account is simple and straightforward. By following our guide on how to create a cPanel account, you too can become an expert in minutes. So why wait? Get started today and see what cPanel can do for you!