Learn how to enhance user experience by adding a sticky floating sidebar widget in WordPress. Follow step-by-step instructions and best practices for implementing this feature on your website.
Introduction
WordPress is a versatile platform that allows for extensive customization, including adding a sticky floating sidebar widget.
This feature keeps important content or calls-to-action visible as users scroll down the page, enhancing user experience and engagement. In this guide, we will explore various methods to achieve this effect, catering to different levels of technical expertise.
Why Add a Sticky Floating Sidebar Widget?
A sticky floating sidebar widget can significantly improve user experience by providing persistent access to important content, such as social media links, subscription forms, or navigation menus. It ensures that these elements remain visible and easily accessible, leading to increased engagement and conversions.
Method 1: Using a WordPress Plugin
For beginners or those looking for a quick solution, using a WordPress plugin is often the easiest way to add a sticky floating sidebar widget. Follow these steps to install and configure a plugin:
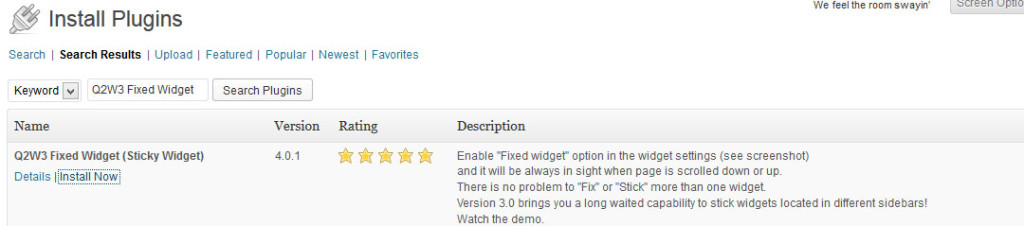
1. Choose a Plugin: Search for “sticky sidebar widget” in the WordPress Plugin Directory. Some popular options include Q2W3 Fixed Widget, Sticky Menu (or Anything!) on Scroll, and WP Floating Sidebar.
2. Install the Plugin: Click on the “Install Now” button next to the plugin name, then activate it.
3. Configure the Plugin: Once activated, go to the plugin’s settings in the WordPress dashboard. Here, you can choose which widget you want to make sticky and configure its behavior.
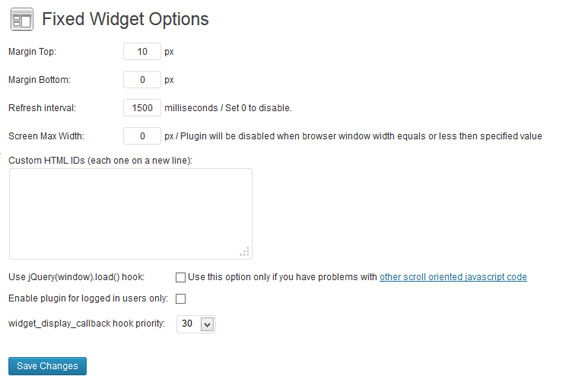
4. Save Changes: After configuring the plugin settings, save your changes. The sticky sidebar widget should now be active on your website.
Method 2: Manually Adding Code to Your Theme
If you prefer a more hands-on approach and have some coding knowledge, you can manually add the necessary code to your WordPress theme. Follow these steps:
1. Create a Child Theme: To avoid losing customizations during theme updates, create a child theme if you haven’t already.
2. Open Your Theme’s Functions.php File: Using a code editor, open the functions.php file of your child theme.
3. Register a Custom Widget Area: Insert the following PHP code snippet to register a custom widget area in your theme:
function my_custom_sidebar() {
    register_sidebar( array(
        'name'          => __( 'Sticky Sidebar', 'textdomain' ),
        'id'            => 'sticky-sidebar',
        'description'   => __( 'Add widgets here to make them sticky.', 'textdomain' ),
        'before_widget' => '<div id="%1$s" class="widget %2$s">',
        'after_widget'  => '</div>',
        'before_title'  => '<h2 class="widget-title">',
        'after_title'   => '</h2>',
    ) );
}
add_action( 'widgets_init', 'my_custom_sidebar' );
4. Add CSS Styles: Add the following CSS code to your theme’s style.css file to style the sticky sidebar:
#sticky-sidebar {
    position: -webkit-sticky;
    position: sticky;
    top: 0;
}
5. Add the Widget to Your Sidebar: Go to Appearance » Widgets in your WordPress dashboard and drag a widget into the “Sticky Sidebar” widget area.
6. Save Changes: Save your changes and refresh your website to see the sticky sidebar in action.
Additional Methods for Adding a Sticky Floating Sidebar Widget
Method 3: Using CSS and JavaScript
If you want more control over the styling and behavior of your sticky sidebar widget, you can achieve this effect using CSS and JavaScript. Follow these steps:
1. Add HTML Markup: In your theme’s template file (e.g., sidebar.php), wrap your sidebar widget in a <div> with a specific ID.
<div id="my-sticky-sidebar">
    <?php dynamic_sidebar( 'sidebar-1' ); ?>
</div>
2. Add CSS Styles: Add the following CSS code to your theme’s style.css file to style the sticky sidebar:
#my-sticky-sidebar {
    position: -webkit-sticky;
    position: sticky;
    top: 20px; /* Adjust this value as needed */
}
3. Add JavaScript: Add the following JavaScript code to your theme’s footer.php file or create a new JavaScript file and enqueue it in your theme’s functions.php file:
jQuery(document).ready(function($) {
    var sidebar = $('#my-sticky-sidebar');
    if (sidebar.length) {
        var sidebarOffset = sidebar.offset().top;
        $(window).scroll(function() {
            if ($(window).scrollTop() > sidebarOffset) {
                sidebar.css({
                    'position': 'fixed',
                    'top': '20px', /* Adjust this value as needed */
                    'width': sidebar.width()
                });
            } else {
                sidebar.css({
                    'position': 'static',
                    'top': 'auto',
                    'width': 'auto'
                });
            }
        });
    }
});
4. Save Changes: Save your changes and refresh your website to see the sticky sidebar in action.
Method 4: Using a Page Builder Plugin
If you’re using a page builder plugin like Elementor, Beaver Builder, or Divi, adding a sticky floating sidebar widget is usually a built-in feature. Simply add a widget to your sidebar area, and look for an option to make it sticky in the widget settings or within the page builder’s interface.
Advanced Customization and Best Practices
1. Custom Sticky Behavior: Modify the sticky behavior of the sidebar using CSS and JavaScript. For example, you can add an animation effect when the sidebar becomes sticky or change its position based on the scroll direction.
2. Conditional Sticky Widgets: Use WordPress conditional tags in your theme’s functions.php file to make widgets sticky on specific pages or posts. For example, you can make a widget sticky only on the homepage or on posts in a certain category.
3. Multiple Sticky Sidebars: Implement multiple sticky sidebars on different parts of your website. Use CSS to style each sidebar differently and JavaScript to manage their sticky behavior individually.
4. Performance Optimization: Ensure that your sticky sidebar implementation does not negatively impact your website’s performance. Minimize the use of JavaScript and CSS, and optimize your code for faster loading times.
5. Responsive Design: Make sure your sticky sidebar is responsive and works well on all devices. Test its behavior on different screen sizes to ensure a consistent user experience.
6. Accessibility: Ensure that your sticky sidebar is accessible to all users, including those using screen readers or keyboard navigation. Use semantic HTML and provide alternative text for images and other non-text content.
7. Testing and Feedback: Test your sticky sidebar implementation thoroughly on different browsers and devices. Gather feedback from users to identify any usability issues and make improvements accordingly.
Conclusion
Adding a sticky floating sidebar widget in WordPress can significantly improve the usability and functionality of your website. Whether you choose to use a plugin, manually add code to your theme, or customize the behavior using CSS and JavaScript, the key is to create a seamless user experience that enhances engagement and conversion rates. Implement the methods and best practices outlined in this guide to create an effective sticky sidebar widget for your WordPress site.
If you enjoyed this article, then you’ll love Zalvis's WordPress Hosting platform. Turbocharge your website and get 24/7 support from our veteran team. Our world-class hosting infrastructure focuses on auto-scaling, performance, and security. Let us show you the Zalvis difference! Check out our plans.